Mach3 CNC Configuration for 4-Axis TB6560 Parallel Port
Mach3 is the software that transforms a computer into a CNC machine controller. If you can’t get your machine to work, I hope this helps you. If it still doesn’t work, please contact me, and I’ll be happy to help. I get quite a few questions from all over the world.

Before you start
Mach3 is quite old now and there is a new version called Mach4 that will need extra hardware. So if you received your copy of Mach3 as part of a kit from a Chinese vendor and popped it in your computer then you need to check your computer meets these requirements.
Mach3 will only work on 32-bit versions of Windows from Windows 2000 to Windows 7 with the built-in parallel port driver. I use it with Windows XP 32bit, which works absolutely fine. It requires a parallel port, the old 25-pin printer port.
You can get Mach3 to work the USB interface but you will need to buy some additional hardware and it will then work on later versions of Windows I’ve posted an article here https://rckeith.co.uk/mach3-parallel-port/ showing all the options.
My machine has been working for several years now and I’ve made quite a few wings and fuselages check out these pages on the site Flying Wing and Hurricane.
It took me a while and I had to draw information from several sources. There’s quite a lot of information for 3-axis routers but when you get to the 4-Axis there isn’t as much. So I decided to document my own TB6560 setup for my own reference and help others as I’ve had some great help from people on the internet. I’ve also used the TB6560 4-axis board for my OX 3 axis router from OpenBuilds.
The images below show some of my projects using Mach3


As you can see from the build page here I used the TB6560 controller and NEMA 23 steppers from China.
| Qty | Description |
| 1 | 4 Axis TB6560 Controller Board |
| 1 | 4 Axis TB6560 Controller Board All in one with power supply. Drivers all on one board are usually cheaper |
| 4 | NEMA 23 Stepper Motors 57BYGH56-401A or similar. |
You see some negative comments about the TB6560 but I must say I’ve had no issues with mine. The only thing you have to do is spend a bit more time on the instructions which usually aren’t the best.
Axis configuration
I’ve had a few emails asking about which configuration I have my axis in. So I’ve taken a picture which explains it much better than words.

Mach3 configuration
I’d recommend watching the tutorial videos from the Mach3 website http://www.machsupport.com/videos/ the first 4 are good to get you going. Mach3 can be a bit overwhelming when you first start it up. It has lots of options which for hot wire foam cutting aren’t needed. The terminology can be a bit of a challenge if this is your first time e.g. DRO, MDI If you watch the interface video it’s all explained.
Mach3 will only work on a 32-bit version of Windows from 2000 to Windows 7 and you need a PC with a printer port. If your PC doesn’t have one then an add-on card can usually be used without any problems Check my post here to make sure you get the right type. I use Windows XP on an old Dell GX620 ussf I got from eBay with 2GB of RAM.
Don’t use a laptop ArtSoft doesn’t recommend it due to the power-saving features used on laptops, which can cause missed steps. My PC was a fresh install and nothing else on it. It’s not connected to the internet so I have no need for anti-virus and updates. I’ve even switched lots of unnecessary services off. I get the g-code on with a USB memory sticks.
Homing and Limit Switches
Once I had the basic of the machine working I set about fitting some home/limit switches and an E-Stop (Emergency Stop)

It’s wired up as below download a copy here

The small 5-port ribbon connector on the controller is used to connect all the switches in series. As I used RJ45 LAN cables with 8 wires I was able to use 2 of the 4 spares to get the inputs back to the controller board without any extra wires.
When the switches are wired up go to the Mach3 diagnostics screen and test that each switch lights up all LEDs as screenshot shown below
Mach3 is clever enough to know which axis the input relates to. This confused me a bit a first but it works. If you press REF ALL HOME each axis should home. It goes to the switch and then as it trips it reverses and comes off. I had a problem with this to start with. The X-axis would trip the home/X – – switch and just stop. I posted this on the Mach3 forum and within a few minutes, I got some help. Posted the config file and a guy called “Hood” had the answer after I explained what was happening to the X-axis. It was being caused by some interference from somewhere (switches were all new). In the general config page, there is a setting called “debounce”. I put in 200 as “Hood” suggested and it worked perfectly.
The switches are for safety and for returning to the same home position. I also screw the towers securely down onto a longboard to stop any spring tension on the wire from moving them. I have a width of 44” an X travel of 16” and a Y of 11 “.
I use Mach3 to drive the machine and Profili2 to design the wing panels and generate the g-code.
TB6560 4-axis manual
Follow the manual that came with the TB6560. If you don’t have it here’s a copy Manual-TB6560_4Axis_Driver
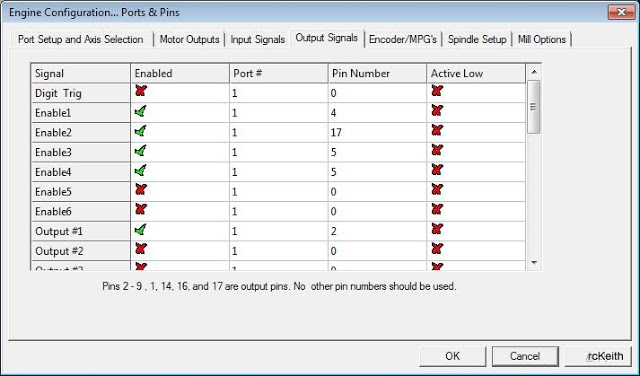
Here are my settings which are the same as the manual apart from the input signals
Config->Ports and Pins [Motors Output] tab

Config->Ports and Pins [Input Signals] tab

Config->Ports and Pins [Input Signals] tab showing E-stop on port 10

Config->Ports and Pins [Output Signals] tab
Config->Homing/Limits
My machine is configured in inches so this setups the soft limits (if you had no switches) and direction to home

You can also set up soft keys as well so you can jog the axis whit the key of your choice
With everything set up as above, you should be able to jog each axis. Press the TAB key and a window pops up which you can use to move the axis
Calibration
This was the part where I thought I would need to do some tricky maths to get the axis to move the correct distance when a command was sent. Let me explain with an example.
G20
G0 X1 A1 Y0 Z0
This line of code says to move the X and Y axis to 1 inch from the zero setting. (G20 means work in inches). So when Mach3 sends this to the machine it should move 1 inch. But that also depends on the thread used on your lead screws and the number of steps the motor makes. There are some details in the Mach3 documentation on how to do this, but Mach3 has an easier way.
First, you’ll need something accurate to measure with, I used a digital vernier calliper. Then you’ll need to measure how far the axis has moved. I clamped a stop on the base of the X-axis and make sure I can use the calliper to measure to the moving tower of the X-axis. Zero your calliper and then go to the settings page

Select Steps per Unit and then the X-axis ( you can use any axis). When the dialogue box appears and says “How far would you like to move” enter a distance e.g. 1.0 then the axis will move. When it stops and says “How far did the axis move? (Measure Value)” then measure with the vernier calliper and enter the value. Mach3 will work out the steps per unit and save you from having to do all the maths. Maybe worth doing this a couple of times. For hot wire foam cutting this is good enough, but if this were a router or mill the accuracy may not be acceptable.
Hot Wire Settings and Feed (updated)
I use an iCharger 206B to power my wire and I did use 0.8 MIG welding wire. I’ve found that a feed rate of 96 works OK in the g-code. The power of the wire depends on the foam used. For pink XPS I use 4.1 amps, and white foam a little less. For tapered wings, you need to adjust the kerf value ( this is how much foam is melted by the wire) at both the root and tip. Profili2 Pro has this option, but it’s a bit of trial and error.
I’ve now found much better results with very thin wire. I’m using some that are about 0.5mm and 2.6 amps on my iCharger with a feed rate of 115 in Profili2 and DevFus Foam. This now makes very good pieces.

Conclusion
The hardest part of CNC is by far the software if you can’t get it working. I now have a CNC router and 3D printer which all work really well but you just have to put the time in and build your knowledge. At first, it seems too much to take in but stick with it and seek help on the internet there are some good resources out there, and the CNC forums have helped me many times.
Drop me a line if you are struggling and I’ll do my best to get you up and running.
Mach3 isn’t the only solution to control your machine. Check my post https://rckeith.co.uk/free-cnc-software-3-and-4-axis/ if you can’t afford the license cost.

